Introduction
Human operators are the single largest contamination source in cleanrooms, accounting for 46% of all particle contamination. A person sitting still generates approximately 100,000 particles ≥0.3 μm per minute, while active movement increases this to 5 million particles per minute. Even more concerning, humans shed about 40,000 skin cells every minute, each potentially carrying microorganisms into controlled environments.
This contamination risk makes proper gowning procedures the first and most critical line of defense. Without rigorous gowning protocols, even the most advanced HEPA filtration systems and cleanroom infrastructure can be compromised.
The stakes are high: pharmaceutical manufacturers spend an average of USD $3.1 million annually addressing contamination events, and a single Class 1 recall can cost millions while risking patient lives.
This guide covers:
- The complete gowning process from pre-entry preparations through final checks
- ISO classification requirements that determine gowning stringency
- Common mistakes that lead to contamination
- Facility design considerations essential for effective contamination control
Key Takeaways
- Proper gowning prevents human particles and microorganisms from contaminating controlled environments
- ISO 5 environments require sterile suits with full coverage; ISO 8 needs basic protective garments
- The gowning sequence always follows top-to-bottom order (head to feet) to prevent gravity-driven contamination transfer
- Proper facility design with dedicated gowning rooms, pressure cascades, and appropriate equipment is essential for contamination control
What is Cleanroom Gowning and Why It Matters
Every person entering a cleanroom carries millions of contaminating particles. Cleanroom gowning is the systematic process of donning specialized protective garments that create a physical barrier between personnel and the controlled environment, preventing particles, skin cells, hair, and microorganisms from compromising sensitive products or processes.
The Human Contamination Challenge
The human body acts as a continuous particle generator:
- Stationary personnel: ~100,000 particles ≥0.3 μm per minute
- Active personnel: ~5,000,000 particles ≥0.3 μm per minute
- Skin shedding: ~40,000 skin cells per minute
- Hand contamination: Up to 10,000 microorganisms per square inch

Economic Impact of Gowning Failures
Improper gowning can negate millions of dollars in cleanroom infrastructure investment:
- Average annual remediation costs: $3.1 million for pharmaceutical manufacturers
- Single contamination investigation: $10,000-$60,000
- FDA recalls (2004-2011): 1,734 drug recalls, with 91 classified as Class 1 (potential for death)
These aren't just statistics. In 2023, Iso-Tex Diagnostics received an FDA Warning Letter specifically citing "poor sterile gowning behavior."
Inspectors documented operators with exposed facial skin and hair entering ISO 5 areas, and sterile gowns touching the floor during donning—violations that directly compromised product sterility.
Industries Where Gowning is Critical
- Pharmaceuticals: Sterile drug manufacturing, compounding
- Biotechnology: Cell culture, biologics production
- Medical Devices: Implantable device assembly, surgical instrument packaging
- Semiconductors: Chip fabrication, wafer processing
- Aerospace: Satellite assembly, precision optics
- Research Laboratories: Clinical trials, microbiological research
Step-by-Step Cleanroom Gowning Procedure
Pre-Gowning Preparation (Before Entering Gowning Area)
Prohibited Items:
Remove all personal items that can shed particles or harbor contaminants:
- Jewelry (watches, rings, bracelets, necklaces)
- Cosmetics and perfumes
- Mobile phones and personal electronics
- Outdoor clothing (except personal underwear for higher-grade areas)
Personal Hygiene Requirements:
- Wash hands and forearms thoroughly with soap
- Ensure hair is clean and dry
- Address any skin conditions that cause excessive shedding
- Wear appropriate street clothing: enclosed shoes, long pants, shirts with sleeves
Health Screening:
Beyond basic hygiene, personnel must be screened for health conditions. Anyone with active skin conditions, respiratory infections, or open wounds should be excluded from cleanroom entry until the condition resolves. These issues cause abnormal particle shedding that compromises contamination control.
Entering the Gowning Room
Transition from Uncontrolled to Controlled Areas:
- Step onto sticky mats to remove large particles from shoe soles
- Cross the threshold into the designated gowning area
- Use the cross-over bench as the primary barrier—never step on the clean side with street shoes
Initial Barriers:
- Shoe covers first: Put on disposable shoe covers or dedicated cleanroom footwear
- Hairnet/bouffant cap: Ensure all hair is completely covered, including sideburns and hairline
- Beard covers: Required for all facial hair, no exceptions
Primary Gowning Sequence (Inside Gowning Room)
The gowning sequence follows a strict top-to-bottom approach to prevent particles from falling onto already-covered areas. Each step builds the contamination barrier systematically.
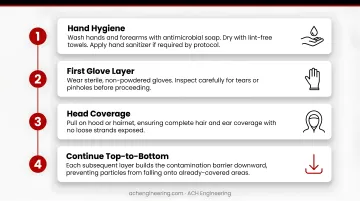
1. Hand Hygiene
- Wash hands and forearms with antimicrobial soap, then dry with lint-free towels
- Apply hand sanitizer if required by protocol
2. First Glove Layer (for aseptic environments)
- Wear sterile, non-powdered gloves and inspect for tears
3. Head Coverage
- Pull on hood or hairnet, ensuring complete hair coverage
- Tuck hood collar under suit neck opening (completed in step 5)
4. Face Protection (for ISO 5/Grade A-B)
- Apply sterile face mask covering nose and mouth completely
- Add sterile eye coverings (goggles) to prevent droplet shedding
5. Cleanroom Coverall
- Hold garment off the floor at all times
- Step into leg openings carefully, pull suit over shoulders
- Close all zippers and snaps completely
- Tuck hood into suit collar to create seal
6. Footwear
- Pull on sterile over-boots or dedicated cleanroom boots
- Tuck coverall legs inside boot tops to create downward overlap
- Use gowning bench or lean rail for balance
7. Second Glove Layer
- Wear second pair of sterile gloves
- Pull glove cuffs over coverall sleeves to create seal, then inspect for proper fit
Overlapping Principle:
Each layer must overlap the previous one in a downward direction to create a continuous barrier with no gaps. This prevents skin or street clothes from being exposed:
- Hood tucks into suit collar
- Suit sleeves extend to wrist
- Gloves cover suit sleeves
- Suit legs tuck into boots
Final Checks and Entry
Mirror Self-Inspection Checklist:
Stand before a full-length mirror and verify:
- All zippers fully closed
- All snaps fastened
- Hood completely covers hair and tucks into suit
- Face mask and goggles properly positioned (if required)
- No gaps between gloves and sleeves
- Suit legs properly tucked into boots
- No street clothes visible anywhere
- Garment fits properly without excessive looseness
Material Wipe-Down:
Before entering the cleanroom:
- Wipe all items (notebooks, tools, materials) with approved disinfectant
- Use lint-free wipes and appropriate cleaning agents
- Allow proper contact time for disinfection
Airlock Entry:
- Enter airlock system when indicator shows availability
- Close outer door completely before opening inner door
- Allow air shower cycle to complete if equipped
- Step through carefully to avoid touching doorframes
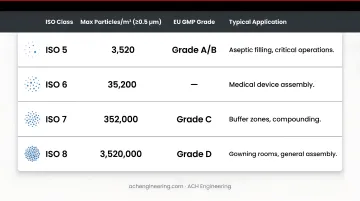
Gowning Requirements by ISO Classification
ISO 14644-1:2015 defines cleanroom classifications based on maximum allowable particle concentrations. Gowning requirements scale with these classifications.
ISO Classification Particle Limits
| ISO Class | Max Particles/m³ (≥0.5 μm) | EU GMP Grade | Typical Application |
|---|---|---|---|
| ISO 5 | 3,520 | Grade A/B | Aseptic filling, critical operations |
| ISO 6 | 35,200 | — | Medical device assembly |
| ISO 7 | 352,000 | Grade C | Buffer zones, compounding |
| ISO 8 | 3,520,000 | Grade D | Gowning rooms, general assembly |
ISO Class 8 Requirements (Less Strict)
Basic protective garments:
- Hairnet or bouffant cap covering all hair
- Beard cover for facial hair
- Knee-length smock or full coverall
- Shoe covers or dedicated cleanroom footwear
- Non-sterile gloves for product contact
Appropriate for:
- General manufacturing areas
- Packaging operations
- Non-sterile pharmaceutical compounding
- Electronics assembly
ISO Class 7 and 6 Requirements (Moderate Control Level)
Moving to more controlled environments, Class 7 and 6 cleanrooms require more comprehensive garment coverage.
Advanced protective garments:
- Full coveralls with integrated or attached hood
- High-neck design to minimize skin exposure
- Cleanroom-specific footwear (not disposable covers)
- Double gloving recommended for critical operations
- Face masks may be required based on risk assessment
Appropriate for:
- Sterile compounding buffer rooms
- Manufacturing of medical devices
- Assembling optical components
- Pharmaceutical production support areas
ISO Class 5 and Below (High to Ultra-Clean)
Sterile/aseptic protective garments:
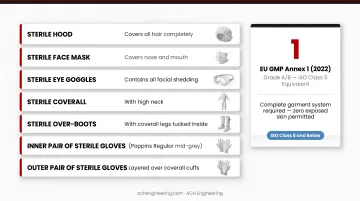
The most stringent environments demand complete garment systems with zero exposed skin. According to EU GMP Annex 1 (2022), Grade A/B environments (equivalent to ISO 5) require:
- Sterile headgear (hood) covering all hair
- Sterile face mask covering nose and mouth
- Sterile eye coverings (goggles) to contain all facial shedding
- Sterile coverall with high neck
- Sterile over-boots with coverall legs tucked inside
- Two pairs of sterile gloves, with outer pair covering sleeves
Critical requirements:
- Zero exposed skin anywhere on the body
- All garments must be sterilised (gamma radiation or autoclave)
- Garments must be non-shedding material
- Regular disinfection of gloves during operations
These strict requirements support the most sensitive manufacturing processes:
Appropriate for:
- Aseptic drug filling operations
- Sterile product manufacturing
- Semiconductor lithography (ISO 4 and below)
- Aerospace critical assembly (ISO 4 and below)
Aseptic vs. Non-Aseptic Gowning Differences
Understanding the distinction between aseptic and non-aseptic gowning helps determine appropriate protocols for your environment.
Aseptic (Sterile) Environments:
- All garments must be sterilised before use
- Sterile gloving technique required (no touch of outer glove surface)
- Face masks and eye protection mandatory
- Gloves disinfected regularly with sterile 70% alcohol
- Microbial monitoring of garments required after any breach or contamination event
Non-Aseptic Environments:
- Garments must be clean but not necessarily sterile
- Focus on particle control rather than sterility
- Face masks and goggles based on risk assessment
- Glove disinfection protocols less frequent
- Monitoring focuses on particle counts rather than microbial contamination
Common Gowning Mistakes and How to Avoid Them
Even experienced personnel make gowning errors that compromise cleanroom integrity. Recognizing these common mistakes helps facilities strengthen their contamination control protocols and reduce compliance risks.
Procedural and Technique Errors
1. Rushing Through the Process
Skipping steps or incomplete coverage creates contamination risks. The FDA Warning Letter to Iso-Tex documented operators with exposed facial skin and hair, direct results of rushing.
Solution: Establish minimum gowning time requirements and use visual checklists at each stage.
2. Floor Contact
Sterile garments that touch the floor during donning transfer contamination directly to clean surfaces.
Solution: Use gowning benches or lean rails for support. Practice the sequence until you can complete it without balance issues.
3. Improper Sequencing
Putting on gloves before the coverall or failing to tuck layers properly compromises barrier integrity.
Solution: Post step-by-step visual guides at eye level in gowning rooms. Conduct regular competency assessments.
Coverage and Contamination Control
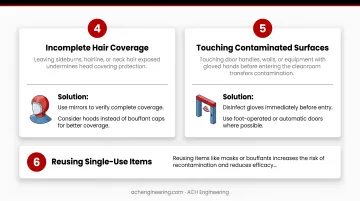
4. Incomplete Hair Coverage
Leaving sideburns, hairline, or neck hair exposed undermines head covering protection.
Solution: Use mirrors to verify complete coverage. Consider hoods instead of bouffant caps for better coverage.
5. Touching Contaminated Surfaces
Touching door handles, walls, or equipment with gloved hands before entering the cleanroom transfers contamination.
Solution: Disinfect gloves immediately before entry. Use foot-operated or automatic doors where possible.
6. Reusing Single-Use Garments
Attempting to reuse disposable garments or wearing them beyond specified time limits.
Solution: Implement clear garment change schedules. Use different coloured garments for different areas to prevent cross-contamination.
What You Need Before Gowning: Facility and Equipment Requirements
Gowning Room Design Considerations
Pressure Cascade Requirements:
EU GMP Annex 1 mandates that adjacent rooms of different grades maintain a pressure differential of at least 10 Pascals. Gowning rooms must maintain positive pressure relative to lower-grade areas to prevent contamination ingress.
Physical Separation:
- Clear demarcation between "dirty" (street clothes) and "clean" (gowned) zones
- Cross-over benches to prevent tracking contamination
- Separate areas for different gowning stages in aseptic facilities
Airlock Systems:
Grade A/B areas require interlocking airlock systems where only one door can open at a time. Grade C/D areas need visual or audible warning systems, and air showers may be incorporated for additional particle removal.
Size and Layout:
Gowning rooms should be classified one grade level cleaner than the areas they serve (e.g., ISO 7 gowning room for ISO 8 cleanroom). Adequate space must be provided for personnel to gown without crowding—typically 25-35 square feet per person.
Essential Gowning Room Equipment
Required Equipment:
- Cross-over benches or lean rails provide support during gowning while maintaining clean/dirty separation
- Full-length mirrors enable self-inspection of gowning integrity before entry
- Garment storage cabinets protect clean garments from contamination
- Glove and supply dispensers provide easy access while minimizing contamination risk
- Sticky mats remove gross particulate from footwear at entry points
- Waste receptacles allow proper disposal of used garments and materials
Modular cleanroom systems from providers like ACH Engineering allow cleanroom gowning rooms to be implemented during initial construction or retrofitted as requirements evolve.
Standard Operating Procedures and Training
Proper gowning extends beyond equipment—comprehensive written procedures and training programs ensure consistent contamination control.
Written SOPs Required:
EU GMP Annex 1 explicitly requires written procedures for gowning that detail, and cleanroom consulting services can help facilities translate these regulatory requirements into practical, audit-ready SOPs:
- Complete step-by-step donning sequence
- Garment specifications for each cleanroom grade
- Hand hygiene protocols
- Self-inspection requirements
- Material transfer procedures
Training Program Components:
- Initial qualification with both visual and microbial assessment
- Annual requalification for aseptic operations
- Competency assessments after process changes
- Remedial training for failed monitoring trends
Assessment Methods:
- Visual observation of gowning technique
- Microbial sampling of gloved fingers, forearms, chest, and hood
- Media fill participation for aseptic operations
- Written knowledge assessments
Personnel who fail monitoring trends or participate in failed media fills must be disqualified from cleanroom entry and retrained before returning to operations.
Frequently Asked Questions
What is cleanroom gowning?
Cleanroom gowning is the process of donning specialized protective garments that create a barrier between personnel and sensitive products, minimizing human-generated contamination in controlled environments.
What is the correct order of gowning for a cleanroom?
Follow top-to-bottom order: hairnet/hood, face mask and eye protection (if required), coverall, footwear with suit legs tucked inside, then gloves over sleeves. This sequence prevents particles from falling onto already-covered areas.
What do you wear in a cleanroom?
Basic requirements include hairnet, coverall or smock, shoe covers, and gloves. ISO 5 (Grade A/B) requires sterile garments with full face coverage, while ISO 8 (Grade D) requires only basic protective clothing.
What are the requirements for ISO 8 cleanroom gowning?
ISO 8 requires hairnet or bouffant cap, beard cover (if applicable), knee-length smock or coverall, shoe covers or dedicated footwear, and non-sterile gloves. Face masks are required only when specified by the facility's contamination control strategy.
How often should cleanroom garments be changed?
Disposable garments are single-use per entry, while reusable garments require laundering after each use. For aseptic operations, change garments multiple times per shift if contamination is suspected.
Can you reuse disposable cleanroom garments?
No. Disposable garments are designed for single use and should never be reused. Reusing disposable garments compromises their protective barrier and introduces contamination risks that can negate all other cleanroom controls.